Badminton is one of the most popular indoor and outdoor sports in the world. Whether played professionally, in schools, or recreationally in sports clubs, the game depends heavily on a properly designed court layout. Understanding the badminton court diagram is essential for players, coaches, facility planners, and sports infrastructure developers.
A badminton court diagram visually represents the court dimensions, boundary lines, service areas, and net placement required for official play. These markings are standardized by international governing bodies to ensure fairness and consistency in the game.
This guide explains the badminton court diagram in detail, including court dimensions, line markings, singles and doubles layouts, and how a professional badminton court is constructed.
What Is a Badminton Court Diagram?
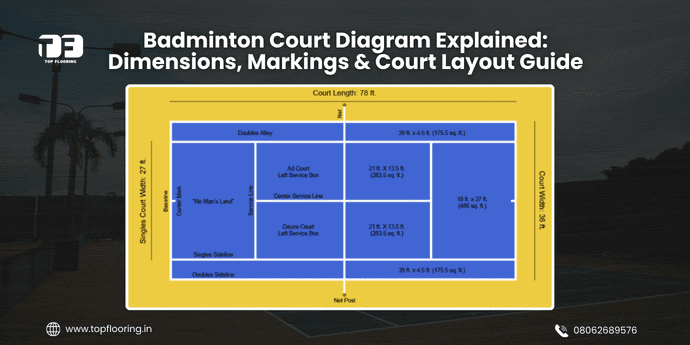
A badminton court diagram is a visual representation of the court layout showing all the important markings and measurements required for gameplay. It helps players understand where they must serve, defend, and score points.
The diagram typically includes:
- Court boundaries
- Net placement
- Singles sidelines
- Doubles sidelines
- Service lines
- Center line
- Back boundary lines
Understanding these elements allows players to interpret rules correctly and maintain proper positioning during rallies.
Badminton courts are rectangular and divided into two equal halves by a net. Each half contains specific service areas and boundary lines that determine whether a shot is considered in or out.
Official Badminton Court Dimensions
The badminton court dimensions are standardized worldwide to maintain consistency across professional tournaments, schools, and recreational facilities.
Standard Court Measurements
- Total Court Length: 13.4 meters (44 feet)
- Court Width (Doubles): 6.1 meters (20 feet)
- Court Width (Singles): 5.18 meters (17 feet)
- Net Height (Center): 1.524 meters (5 feet)
- Net Height (Posts): 1.55 meters (5 feet 1 inch)
These measurements apply to all official badminton courts, including those used in international tournaments.
Understanding the Badminton Court Layout
A badminton court diagram is divided into different zones that define how the game is played. Each zone serves a specific function during gameplay.
1. The Net Line
The net divides the badminton court into two equal halves. Players must hit the shuttlecock over the net to land it within the opponent’s boundaries.
The net must remain tight and properly installed to maintain accurate gameplay conditions.
2. Center Line
The center line runs perpendicular from the net to the back boundary line and divides the service court into left and right sections.
During serves, players must serve diagonally across the net into the opponent’s service box.
3. Short Service Line
The short service line is located 1.98 meters (6 feet 6 inches) from the net.
During a serve, the shuttle must land beyond this line. If it falls before the short service line, the serve is considered a fault.
4. Long Service Line
The long service line defines the maximum distance a shuttlecock can travel during a serve.
Interestingly, the long service line differs for singles and doubles:
- Singles: The back boundary line is used as the long service line.
- Doubles: A separate line located slightly before the back boundary is used.
This distinction ensures fairness and proper gameplay dynamics in doubles matches.
5. Singles Sidelines
Singles matches use the inner sidelines, which make the court slightly narrower.
This adjustment reduces the playing width and requires players to cover less horizontal distance, focusing more on speed and endurance.
6. Doubles Sidelines
In doubles matches, players use the outer sidelines, making the court wider.
This creates a larger playing area, encouraging teamwork and strategic positioning between partners.
Differences Between Singles and Doubles Court Layout
Although the badminton court diagram remains largely the same, the boundaries used during singles and doubles matches differ.
Singles Court
- Narrower width
- Uses inner sidelines
- Full court length
This setup focuses more on individual agility and endurance.
Doubles Court
- Wider playing area
- Uses outer sidelines
- Slightly shorter serving length
Doubles matches involve faster rallies and coordinated team play.
Importance of Accurate Court Markings
Correct badminton court markings are crucial for several reasons:
1. Fair Gameplay
Precise court dimensions ensure that both players or teams compete under equal conditions.
2. Rule Enforcement
Referees and umpires rely on accurate lines to determine whether shots are in or out.
3. Professional Standards
International tournaments require courts that follow strict measurement guidelines.
4. Player Performance
Clear markings help players judge shuttle placement and improve strategic play.
Poorly marked courts can cause confusion and affect match outcomes.
Badminton Court Line Markings Explained
A badminton court diagram contains several lines that serve different functions. Understanding them helps players follow the rules more effectively.
Boundary Lines
Boundary lines define the outer limits of the playing area. If the shuttlecock lands outside these lines, it is considered out.
Service Lines
Service lines determine where the shuttle must land during a serve. The short service line and long service line create a defined service zone.
Center Line
The center line divides service areas and guides players during serves.
Back Boundary Line
This line marks the end of the court and acts as the long service line for singles matches.
Badminton Court Surface and Flooring
The quality of the badminton court surface significantly impacts gameplay. A good badminton court floor must provide:
- Proper grip
- Shock absorption
- Consistent shuttle bounce
- Player safety
Modern sports facilities often use synthetic acrylic badminton court flooring systems for badminton courts. These surfaces offer durability, weather resistance, and low maintenance.
Synthetic flooring also ensures uniform traction, which helps players move quickly without slipping.
This type of flooring is widely used in schools, sports academies, community centers, and professional training facilities.
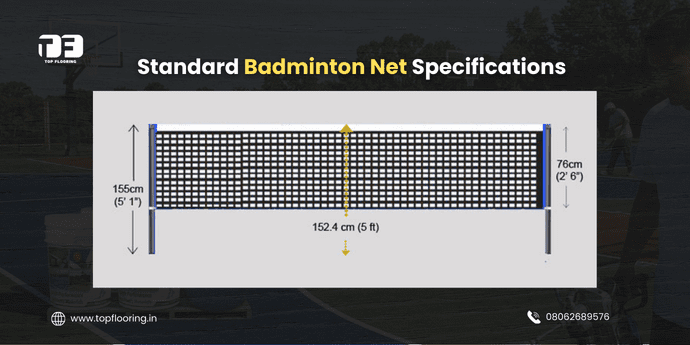
Standard Badminton Net Specifications
The badminton net plays a central role in the court layout.
Net Dimensions
- Width: 6.1 meters (20 feet)
- Height at Posts: 1.55 meters
- Height at Center: 1.524 meters
The net must be securely attached to posts placed exactly on the doubles sidelines.
A white tape band runs along the top edge of the net to maintain structure and visibility.
Space Requirements Around the Court
In addition to the badminton court diagram dimensions, sufficient space around the court is necessary for player movement and safety.
Recommended clearance space:
- Side clearance: At least 1.5 meters
- Back clearance: At least 2 meters
- Ceiling height (indoor courts): Minimum 9 meters
Adequate space ensures players can move freely without obstacles.
How a Professional Badminton Court Is Constructed
Constructing a badminton court requires proper planning and high-quality materials.
Step 1: Base Preparation
The foundation is typically made using concrete or asphalt to ensure structural stability.
Step 2: Surface Coating
Synthetic acrylic coatings are applied to create a smooth and durable playing surface.
Step 3: Line Marking
Accurate badminton court markings are painted using specialized court paint.
Step 4: Net Installation
Net posts and nets are installed according to official height regulations.
Proper construction ensures the court meets professional standards and provides long-term performance.
Common Mistakes When Marking a Badminton Court
Incorrect court markings can affect gameplay and create confusion during matches.
Some common mistakes include:
- Incorrect court width measurements
- Improper placement of service lines
- Using inaccurate singles and doubles boundaries
- Poor quality line paint
- Uneven court surfaces
Following the official badminton court diagram prevents these issues.
Why Understanding the Badminton Court Diagram Is Important
Whether you are a beginner or an experienced player, understanding the badminton court diagram provides several benefits:
- Improves serving accuracy
- Enhances court positioning
- Helps players understand game rules
- Assists coaches in training sessions
- Ensures proper court construction
Knowledge of the court layout allows players to develop better strategies and improve performance.
Conclusion
The badminton court diagram plays a vital role in understanding how the game is structured and played. From court dimensions to service lines and boundary markings, each element of the layout contributes to fair and competitive gameplay.
Accurate badminton court dimensions ensure that players compete on standardized surfaces across schools, clubs, and professional tournaments. Additionally, modern sports facilities benefit from durable surfaces such as synthetic acrylic flooring, which enhances safety, performance, and longevity.
Whether you are building a badminton court or simply learning the game, understanding the court diagram, dimensions, and markings is essential for enjoying badminton to its fullest.
Frequently Asked Questions
A badminton court measures 13.4 meters long and 6.1 meters wide for doubles, while the singles court width is 5.18 meters.
The badminton net height is 1.55 meters at the posts and 1.524 meters at the center.
Singles matches use the inner sidelines, making the court narrower, while doubles matches use the outer sidelines, making the court wider.
The short service line is 1.98 meters from the net, and the shuttle must land beyond this line during a serve.
Synthetic acrylic flooring is commonly used because it provides durability, grip, shock absorption, and low maintenance, making it ideal for sports facilities.